5.4. CA Connectors
You can use privacyIDEA to enroll certificates and assign certificates to users.
You can define connections to Certificate Authorities, that are used when enrolling certificates.

A local CA definition
When you enroll a Token of type certificate the Certificate Signing Request gets signed by one of the CAs attached to privacyIDEA by the CA connectors.
The first CA connector that ships with privacyIDEA is a connector to a local openSSL based Certificate Authority as shown in figure A local CA definition.
When enrolling a certificate token you can choose, which CA should sign the certificate request.
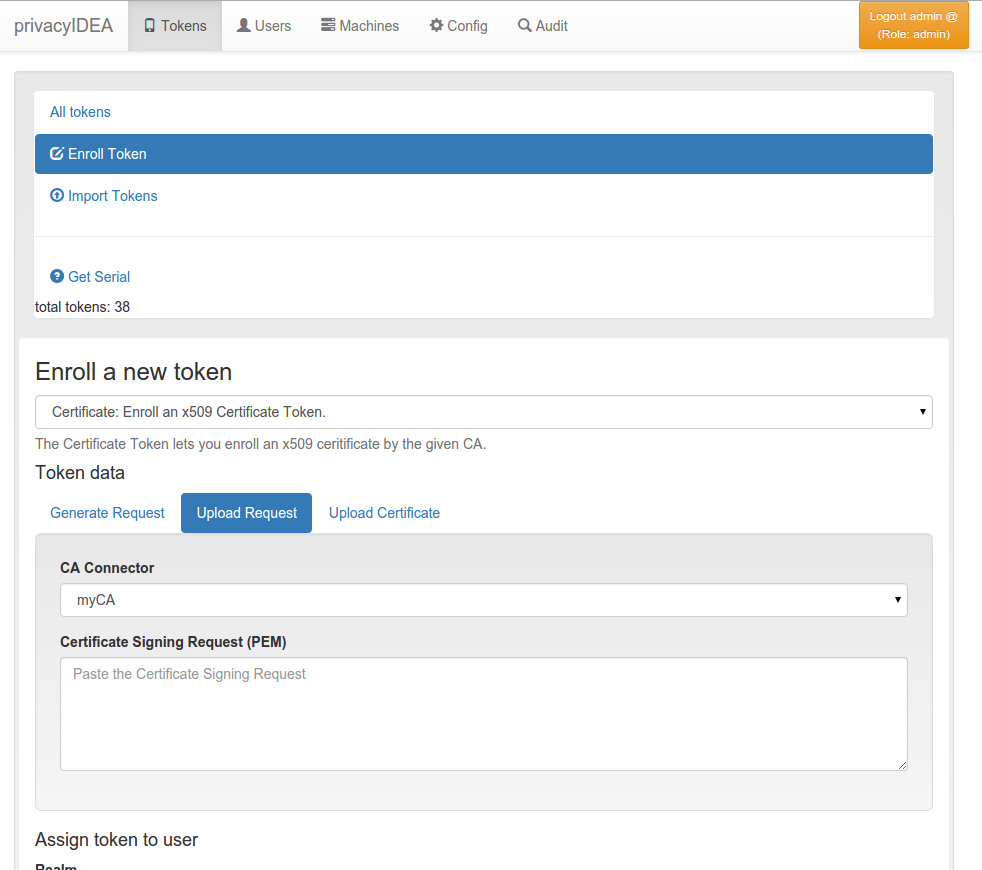
Enrolling a certificate token
5.4.1. Local CA Connector
The local CA connector calls a local openSSL configuration.
Starting with privacyIDEA version 2.12 an example openssl.cnf is provided in /etc/privacyidea/CA/openssl.cnf.
Note
This configuration and also this description is ment to be as an example. When setting up a productive CA, you should ask a PKI consultant for assistance.
5.4.1.1. Manual Setup
Modify the parameters in the file /etc/privacyidea/CA/openssl.cnf according to your needs.
Create your CA certificate:
openssl req -days 1500 -new -x509 -keyout /etc/privacyidea/CA/ca.key \
            -out /etc/privacyidea/CA/ca.crt \
            -config /etc/privacyidea/CA/openssl.cnf

chmod 0600 /etc/privacyidea/CA/ca.key
touch /etc/privacyidea/CA/index.txt
echo 01 > /etc/privacyidea/CA/serial
chown -R privacyidea /etc/privacyidea/CA
Now set up a local CA connector within privacyIDEA with the directory /etc/privacyidea/CA and the files accordingly.
5.4.1.2. Easy Setup
Starting with privacyIDEA version 2.18 it gets easier to setup local CAs.
You can use the The pi-manage Script tool to setup a new CA like this:
pi-manage config ca create myCA
This will ask you for all necessary parameters for the CA and then automatically
Create the files for this new CA and
Create the CA connector in privacyIDEA.
5.4.1.3. Management
There are different ways to enroll a certificate token. See Certificate Token.
When an administrator revokes a certificate token, the certificate is revoked and a CRL is created.
Note
privacyIDEA does not create the CRL regularly. The CRL usually has a validity period of 30 days. I.e. you need to create the CRL on a regular basis. You can use openssl to do so or the pi-manage command.
Starting with version 2.18 the pi-manage command has an additional
sub-command ca (moved to the subcommand config in version 3.10):
pi-manage config ca list
which lists all configured CA connectors. You can use the -v switch to get more
information.
You can create a new CRL with the command:
pi-manage config ca create_crl <CA name>
This command will check the overlap period and only create a new CRL if it is necessary. If you want to force the creation of the CRL, you can use the switch -f.
For more information on pi-manage see The pi-manage Script.
5.4.1.4. Templates
The local CA supports a kind of certificate templates. These “templates”
are predefined combinations of extensions and validity days, as they are
passed to openSSL via the parameters -extensions and -days.
This way the administrator can define certificate templates with certain X.509 extensions like keyUsage, extendedKeyUsage, CDPs or AIAs and certificate validity periods.
The extensions are defined in YAML file and the location of this file is added to the CA connector definition.
The file can look like this, defining three templates “user”, “webserver” and “template3”:
user:
    days: 365
    extensions: "user"
webserver:
    days: 750
    extensions: "server"
template3:
    days: 10
    extensions: "user"
5.4.2. Microsoft CA Connector
This CA connector communicates to the privacyIDEA MS CA worker, that is installed on a Windows server in the Windows Domain. Through this worker, privacyIDEA can connect potentially to all Microsoft CAs in the Windows Domain.
The Microsoft CA Connector has the following options.
Hostname
The hostname (FQDN) or IP address where the privacyIDEA MS CA worker is running.
Note
If you configure Use SSL, you need to provide the correct hostname as it is contained in the server certificate.
Port
The port on which the worker listens.
Connect via Proxy
Whether the worker is situated behind a HTTP proxy.
Domain CA
The worker will provide a list of available CAs in the domain. This is the actual CA to which privacyIDEA shall communicate. After providing the initial connection information hostname and Port, privacyIDEA can fetch the available CAs in the Windows Domain. The CA is identified by the hostname where the Microsoft CA is running and the name of the CA like <hostname>\<name of CA>.
Use SSL
This is a boolean parameter. If it is checked, then privacyIDEA will communicate to the CA worker via TLS. Depending on the worker configuration it will also be required, to provide a client certificate for authentication.
Note
In productive use SSL should always be activated and a client certificate must be used for authentication.
CA certificate
This is the location of the file, that contains the CA certificate, that issued the CA worker server certificate. This file is located on the privacyIDEA server in PEM format.
Client certificate
This is the file location of the certificate that privacyIDEA uses to authenticate against the CA worker. It is in PEM format.
Note
The subject of this certificate must match the name of the privacyIDEA server as seen by the CA worker. It is a good idea to request the client certificate from the CA on the domain where the CA worker is actually running at.
Client private key
This is the location of the file containing the private key that belongs to the Client certificate. It is in PEM format and can either be password protected (encrypted) or not.
The key can be provided in PKCS1 or PKCS8 format.
Note
The PCKCS1 format will start with -----BEGIN RSA PRIVATE KEY-----, the PKCS8 format
will start with -----BEGIN PRIVATE KEY-----.
To convert between PKCS1 and PKCS8 format you can use:
openssl pkcs8 -in private-p1.pem -topk8 -out private-p8.pem -nocrypt
openssl pkcs8 -in private-p1.pem -topk8 -out private-p8-encrypted.pem

openssl rsa -in private-p8.pem -out private-p1.pem
Password of client certificate
This is the password of the encrypted client private key.
Note
We strongly recommend to protect the file with a password. As encrypted key files we only support PKCS8!
5.4.2.1. Basic setup from the command line
Of course the MS CA Connector can be configured in the privacyIDEA Web UI. For quick setup, you can also configure a connector at the command line using The pi-manage Script like this:
pi-manage config ca create -t microsoft <name-of-connector>
It will ask you all relevant questions and setup a connector in privacyIDEA.