5.2. Realms
Users need to be in realms to have tokens assigned. A user, who is not member of a realm can not have a token assigned and can not authenticate.
You can combine several different UserIdResolvers (see User ID Resolvers) into a realm. The system knows one default realm. Users within this default realm can authenticate with their username.
Users in realms, that are not the default realm, need to be additionally identified. Therefor the users need to authenticate with their username and the realm like this:
user@realm
5.2.1. Relate User to a Realm
There are several options to relate a user to a specific realm during
authentication. Usually, if only a login name is given, the user will be
searched in the default realm, indicated with defrealm in the mapping table below.
If a realm parameter is given in a /auth or /validate/check request, it supersedes a possible split realm.
The following table shows different combinations of user(name)-parameter and realm-parameter. Depending on the Use @ sign to split the username and the realm.-setting, the following table shows in which realm the user will be searched.
Input parameter |
|||
|---|---|---|---|
user(name) |
realm |
true |
false |
user |
– |
user ➔ defrealm |
user ➔ defrealm |
user |
realm1 |
user ➔ realm1 |
user ➔ realm1 |
user |
unknown |
– |
– |
user@realm1 |
– |
user ➔ realm1 |
user@realm1 ➔ defrealm |
user@realm1 |
realm1 |
user ➔ realm1 |
user@realm1 ➔ realm1 |
user@realm1 |
realm2 |
user ➔ realm2 |
user@realm1 ➔ realm2 |
user@realm2 |
realm1 |
user ➔ realm1 |
user@realm2 ➔ realm1 |
user@realm1 |
unknown |
– |
– |
user@unknown |
– |
user@unknown ➔ defrealm |
user@unknown ➔ defrealm |
user@unknown |
realm1 |
user@unknown ➔ realm1 |
user@unknown ➔ realm1 |
user@unknown |
unknown |
– |
– |
Note
Be aware that if the Use @ sign to split the username and the realm.-setting is true, a realm parameter is given and a user name with an @-sign is given where the part after the @ denotes a valid realm, the realm parameter will take precedence.
5.2.2. List of Realms
The realms dialog gives you a list of the already defined realms.
It shows the name of the realms, whether it is the default realm and the names of the resolvers, that are combined to this realm.
If multiple nodes exits you can display the realms for each node by selecting the node from the drop down menu. By default all nodes are selected. The resolvers of each node are displayed below the node name. The resolvers in the realm that are not assigned to a node are displayed under ‘All Nodes’.

Realm list of all nodes
Selecting a specific node will only display the realms and resolvers for that node. Realms that do not have a specific configuration for the node will use the general settings that are also shown in the list under ‘All Nodes’.

Realm list of testnode
You can delete or edit an existing realm or create a new realm.
5.2.3. Create Realm
A new realm can be created directly from the realm list. This can only be done for a single node or all nodes. The Create Realm page can be used to create node-specific realms.
Each realm has to have a unique name. The name of the realm is case insensitive. If you create a new realm with the same name like an existing realm, the existing realm gets overwritten.
Select at least one resolver to create the realm. Optionally, a priority can be set for each resolver.
If multiple nodes exist, you can also select the nodes for which the realm will be created. Only one node can be selected from the drop down menu in the create dialogue in the realm list. By default All Nodes is selected, meaning that the realm is not node specific, and the settings will be applied to all nodes.

Create a realm on the list page
For more advanced node-specific settings navigate to the Create Realm page in the sidebar menu. A unique realm name is required and resolvers applicable for all nodes can be selected. Additionally, multiple nodes can be selected from the drop down menu. All selected nodes appear in the table where the resolvers and priorities can be selected unique for each node. Another option is to select non-node specific resolvers and click Apply Selection to Nodes to select the selected resolvers and priorities for all nodes. This can be useful if only the priority differs between nodes.

Create a node-specific realm on the create page
5.2.4. Edit Realm
In the realm list, you con click Edit Realm to edit an existing realm. If only one node exists, the resolvers and priorities can be selected in place. A realm can contain several resolvers.

Edit a realm directly in the realm list
If multiple nodes exists, you are forwarded to an edit page, similar to the create page, where you can edit the realm for each node.

Edit a realm on a separate page
5.2.5. Resolver Priority
Within a realm you can give each resolver a priority. The priority is used to find a user that is located in several resolvers. If a user is located in more than one resolver, the user will be taken from the resolver with the lowest number in the priority.
Priorities are numbers between 1 and 999. The lower the number the higher the priority.
Example:
A user “administrator” is located in a resolver “users” which contains all Active Directory users. And the “administrator” is located in a resolver “admins”, which contains all users in the Security Group “Domain Admins” from the very same domain. Both resolvers are in the realm “AD”, “admins” with priority 1 and “users” with priority 2.
Thus the user “administrator@AD” will always resolve to the user located in resolver “admins”.
This is useful to create policies for the security group “Domain Admins”.
Note
A resolver has a priority per realm. I.e. a resolver can have a different priority in each realm.
5.2.6. Autocreate Realm
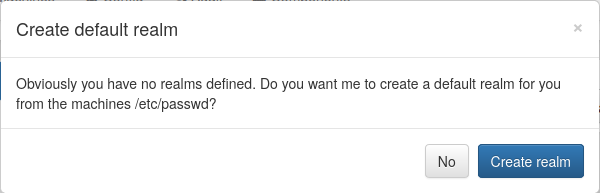
If you have a fresh installation, no resolver and no realm is defined. To get you up and running faster, the system will ask you, if it should create the first realm for you.
If you answer “yes”, it will create a resolver named deflocal
that contains all users from /etc/passwd and a realm named
defrealm with this very resolver.
Thus you can immediately start assigning and enrolling tokens.
If you check “Do not ask again” this will be stored in a cookie in your browser.
Note
The realm defrealm will be the default realm.
So if you create a new realm manually and want this new
realm to be the default realm, you need to set this new
realm to be default manually.