Functionality of the Tokens view
Selecting a token from the list presents a detailed overview on the properties of the token token and also let the administrator or a privileged user perform specific tasks for this token.
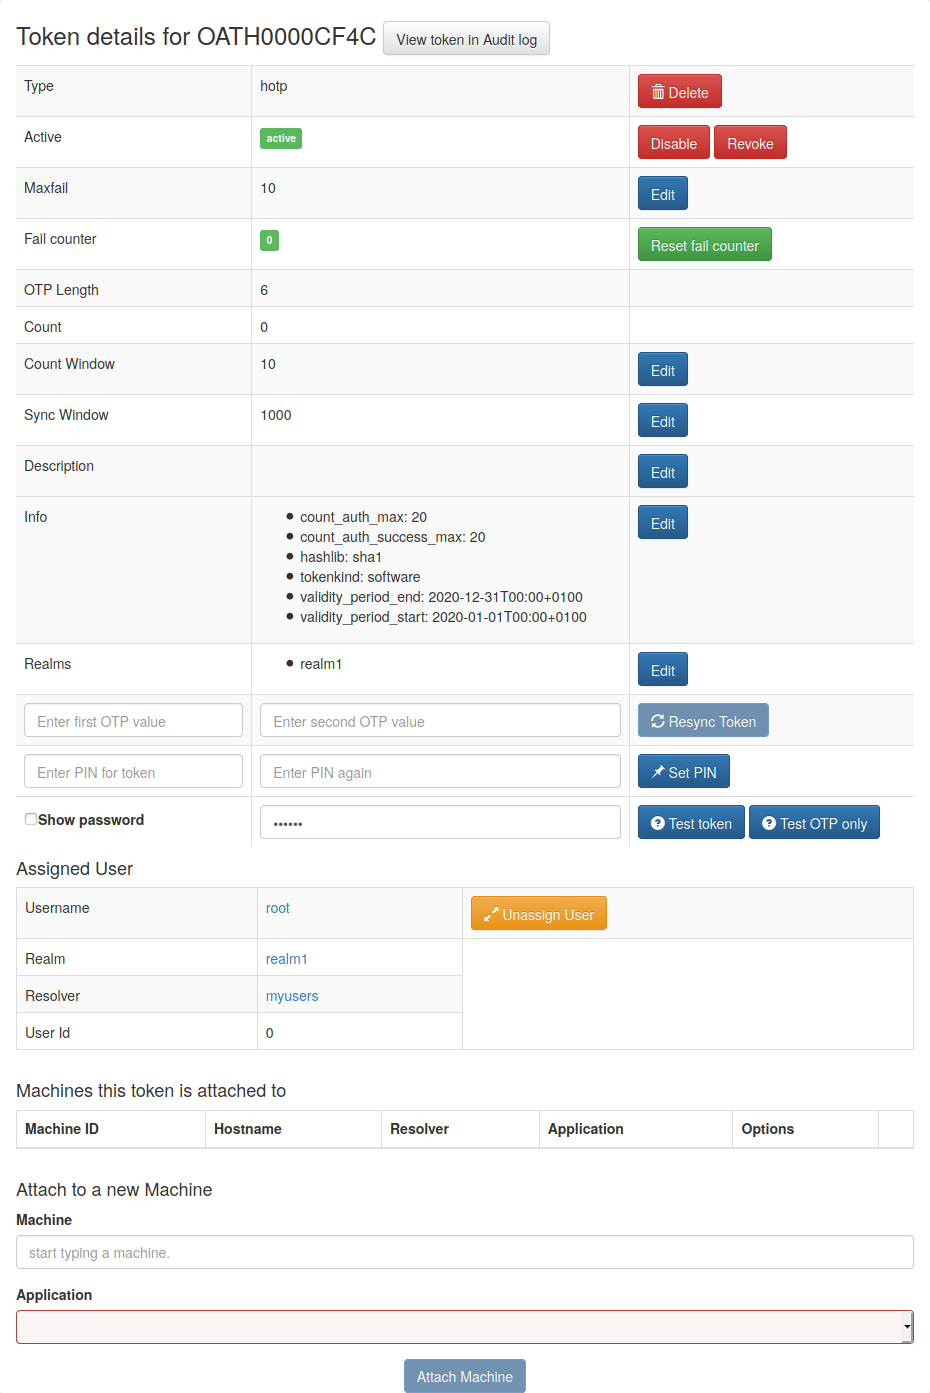
Token Detail
At the bottom you see the assigned user. You can click on the username and change to the User Details.
Lost token
When a user has lost a token, the administrator or the user can create a temporary password token for the user to login.
The administrator or a privileged helpdesk user with a losttoken policy
has to select the token that was lost and click the button Lost token.
A new Password Token is generated.
The OTP PIN of the old token is automatically copied to the new token.
Thus the administrator does not know the OTP PIN, while the user can use his old PIN.

A long password is displayed to the administrator and the administrator can read this password to the user. The user now can authenticate with his old OTP PIN and the long password.
The lost token is deactivated.
Get Serial
The administrator can enter a OTP value that was generated by an unknown token. Then the serial number for the corresponding token is search and displayed.
Note
Since OTP values for all matching tokens need to be calculated, this can be time consuming!
Token settings
You can change the following token settings.
MaxFail and FailCount
If the login fail counter reaches the
MaxFailthe user can not login with this token anymore. The FailcounterFailCounthas to be reset to zero.
TokenDesc
The token description is also displayed in the tokenview. You can set a description to make it easier to identify a token.
CountWindow
The
CountWindowis the look ahead window of event based tokens. If the user pressed the button on an event based token the counter in the token is increased. If the user does not use this otp value to authenticate, the server does not know, that the counter in the token was increased. This way the counter in the token can get out of sync with the server.
SyncWindow
If a token was out of sync (see
CountWindow), then it needs to be synchronized. This is done by entering two consecutive OTP values. The server searches these two values within the nextCountWindow(default 1000) values.
OtpLen
This is the length of the OTP value that is generated by the token. The password that is entered by the user is split according to this length. 6 or 8 characters are split as OTP value and the rest is used as static password (OTP PIN). This value is set during token enrollment.
Hashlib
The HOTP algorithm can be used with SHA1 or SHA256.
Tokeninfo - Auth max
The administrator can set a value how often this token may be used for authentication. If the number of authentication try exceed this value, the token can not be used, until this
Auth maxvalue is increased.
Note
This way you could create tokens, that can be used only once.
Tokeninfo - Auth max success
The administrator can set a value how often this token may be used to successfully authenticate.
Tokeninfo - Valid start
A timestamp can be set. The token will only be usable for authentication after this start time.
Tokeninfo - Validity
A timestamp can be set. The token can only be used within the specified time.
Note
This way you can create temporary tokens for guests or short time or season employees.
Resync Token
The administrator can select one token and then enter two consecutive OTP values to resynchonize the token if it was out of sync.
Set token realm
A token can be assigned to several realms. This is important if you have administrators for different realms. A realm administrator is only allowed to see tokens within his realms. He will not see tokens, that are not in his realm. So you can assign a token to realm A and realm B, thus the administrator A and the administrator B will be able to see the token.
Enroll Token
You can enroll a token either from the Token View or from the User Details. When enrolling a token from the User Details the token is directly assigned to the user.
If you enroll the token from the token view, you can select a user, to whom the token will be assigned.
When enrolling a token, you can select the token type and according to the token type other necessary information.
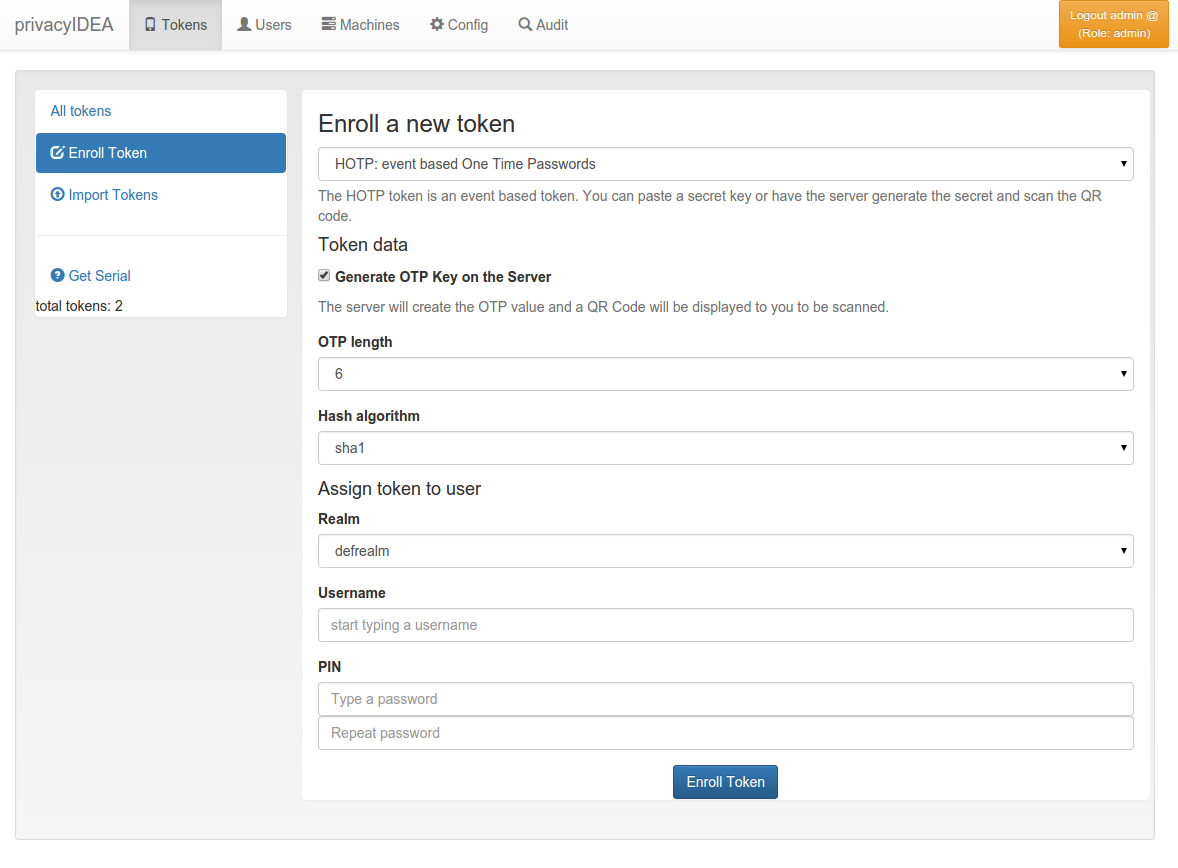
Token enrollment dialog
Assign
This function available in the token details is used to assign a token to a user. Select a realm and start typing a username to find the user, to whom the token should be assigned.
Unassign
In the token details view you can unassign the token. After that, the token can be assigned to a new user.
Enable
If a token is disabled, it can be enabled again.
Disable
Tokens can be disabled. Disabled tokens still belong to the assigned user but those tokens can not be used to authenticate. Disabled tokens can be enabled again.
Set PIN
You can set the OTP PIN or the mOTP PIN for tokens.
Reset Fail counter
If a used locked his token, since he entered wrong OTP values or
wrong OTP PINs, the fail counter has reached the mail failcount.
The administrator or help desk user can select those tokens and
click the button reset failcounter to reset the fail counter
to zero.
The tokens can be used for authentication again.
Delete
Deleting a token will remove the token from the database. The token information can not be recovered. But all events that occurred with this token still remain in the audit log.
Revoke
In contrast of deleting a token, a token may be revoked to disable it permanently while keeping it in the database.