13.4.1. Yubikey Enrollment Tools
The Yubikey can be used with privacyIDEA in Yubico’s own AES mode (Yubico OTP), in the HOTP mode (OATH-HOTP) or the seldom used static password mode.
This section describes tools which can be used to initialize and enroll a Yubikey with privacyIDEA.
If not using the Yubico mode, the Yubikey has to be initialized/configured which creates a new secret on the device that has to be imported to privacyIDEA.
privacyIDEA ships tools to (mass-)enroll Yubikeys in AES mode (Yubikey Token) or HOTP mode (HOTP Token).
13.4.1.1. privacyidea CLI tool
For Linux Clients, there is the privacyidea command line
client [1], to initialize the Yubikeys. You can use the mass enrollment, which
eases the process of initializing a whole bunch of tokens.
Run the command like this:
privacyidea -U https://your.privacyidea.server -a admin token \
yubikey_mass_enroll --yubimode YUBICO
This command initializes the device and creates a new token with the
AES secret and prefix in privacyIDEA. You can enroll Yubikeys
in HOTP mode by using the option --yubimode HOTP which is also the default.
You can choose the slot with --yubislot. For further help call
privacyidea yubikey_mass_enroll with the --help option and refer to
the documentation of the tool [2].
You can also use yubikey_mass_enroll with the option --filename to
write the token configuration to the specified file, which can be imported
later via the privacyIDEA WebUI at Select Tokens -> Import Tokens.
There, select OATH CSV and the file you just created.
13.4.1.2. Yubikey Personalization GUI
You can also initialize the Yubikey with the official Yubico personalization GUI [3] and use the obtained secret to enroll the Yubikey with privacyIDEA. For both AES (Yubico OTP) and OATH-HOTP mode, there are two possibilities to initialize the Yubikey with privacyIDEA.
13.4.1.2.1. Manual token enrollment
To initialize a single Yubikey in AES mode (Yubico OTP) use the Quick button and copy the displayed secret labeled with “Secret Key (16 bytes Hex)” to the field OTP Key on the enrollment form in the privacyIDEA WebUI.
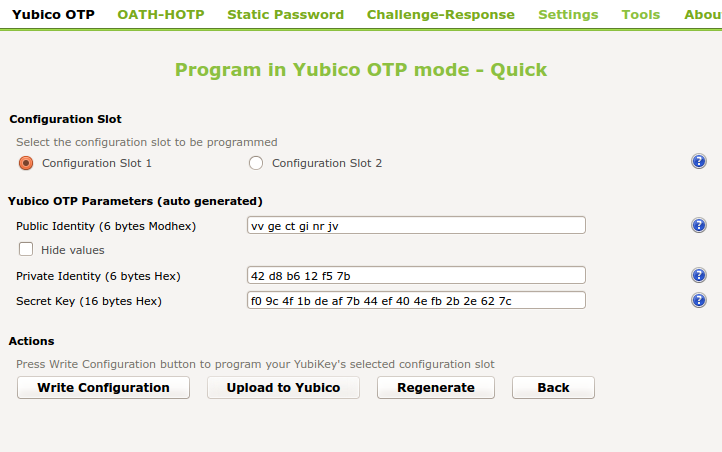
Initialize a Yubikey in AES mode (Yubikey OTP)
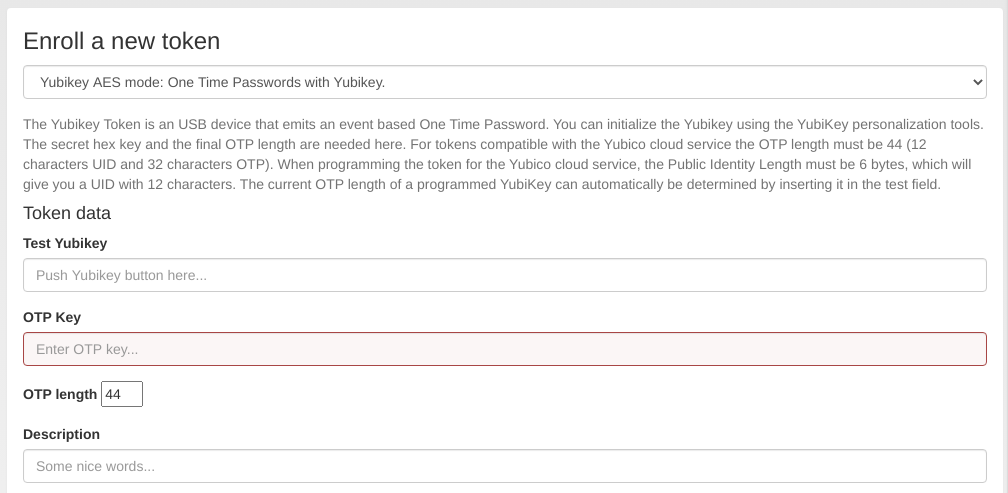
Enroll a Yubikey AES mode token in privacyIDEA
In the field “Test Yubikey” touch the Yubikey button. This will determine the length of the OTP value and the field OTP length is automatically filled.
Note
The length of the unique passcode for each OTP is 32 characters at the end of the OTP value. The remaining characters at the beginning of the OTP value form the Public ID of the device. They remain constant for each OTP [4].
privacyIDEA takes care of separating these parts but it needs to know the complete length of the OTP value to work correctly.
The process is similar for the HOTP mode. You have to deselect OATH Token Identifier. Copy the displayed secret to the HOTP Enrollment form in privacyIDEA.
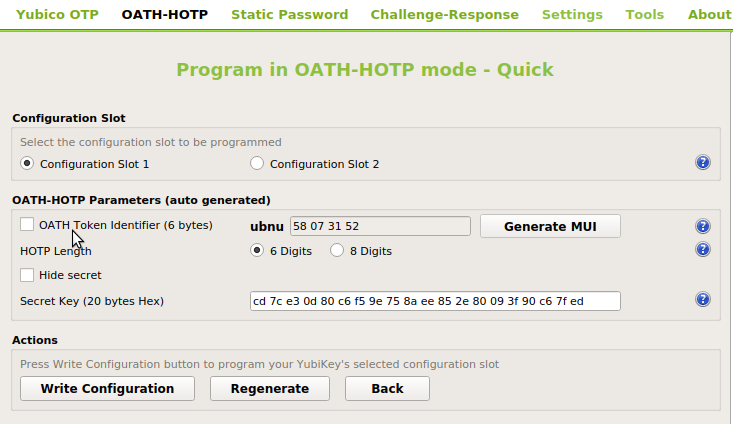
To initialize a single Yubikey in HOTP mode, deselect OATH Token Identifier.
Note
In the case of HOTP mode privacyIDEA can not necessarily distinguish a Yubikey in HOTP mode from a smartphone App in HOTP mode. Using the above mentioned mass-enrollment, the token serial number is used to distinguish these tokens.
13.4.1.2.2. Mass enrollment
To initialize one or more Yubikeys it is convenient to write the created token secrets to a file which can be imported in the privacyIDEA WebUI. To do this, activate Settings -> Log configuration output. We recommend to select Yubico format since here privacyIDEA is able to detect the Yubikey mode and sets the serial accordingly prepending UBOM or UBAM. PSKC format is also supported upon import. You may also use the Flexible format to set custom token serials upon import with OATH CSV.
To set a custom serial for Yubikey Tokens, set the Flexible format to:
YUBIAES{serial}_{configSlot},{secretKeyTxt},yubikey
For Yubikeys in HOTP mode, set the output format as:
YUBIHOTP{serial}_{configSlot},{secretKeyTxt},hotp,{hotpDigits}
Upon clicking Write Configuration for the first time, you will be prompted to select an output file name and the generated configuration is written both to the device and to the selected file. In the Advanced mode select Program Multiple Yubikeys and Automatically program Yubikeys when inserted to program each Yubikey automatically after you insert it.
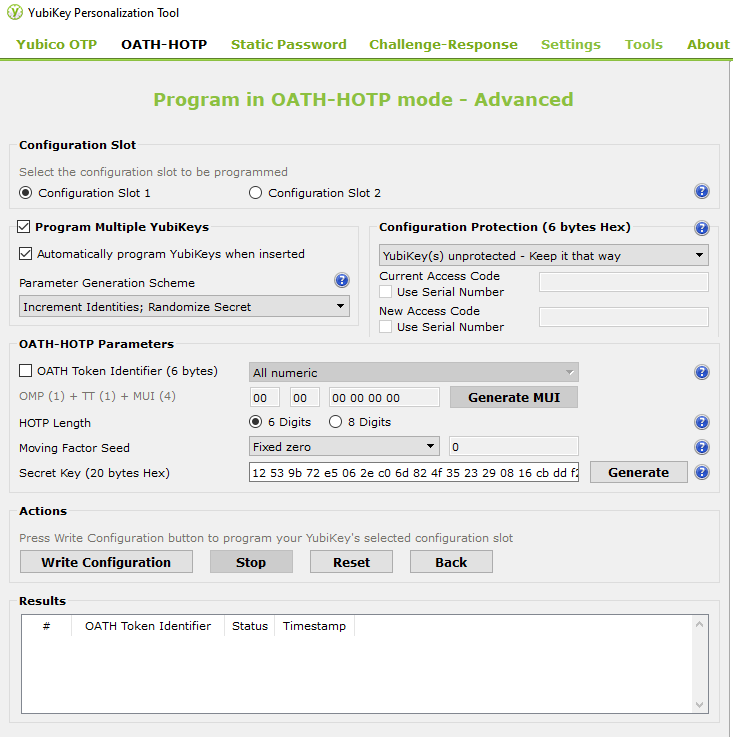
Write Configuration initializes the Yubikey
During this process the token secrets are automatically appended to the selected export file. Note again, that for HOTP, you have to deselect OATH Token Identifier.
After mass-initialization, the token secrets have to be imported to privacyIDEA according to the output format (see Import).
Footnotes