15. Application Plugins
privacyIDEA comes with application plugins. These are plugins for applications like PAM, OTRS, Apache2, FreeRADIUS, ownCloud, simpleSAMLphp or Keycloak which enable these application to authenticate users against privacyIDEA.
You may also write your own application plugin or connect your own application to privacyIDEA. To do so, please check the Plugin Guide.
15.1. Pluggable Authentication Module
The PAM module of privacyIDEA directly communicates with the privacyIDEA server via the API. The PAM module also supports offline authentication. In this case you need to configure an offline token (See Offline).
For more information about building and configuring the PAM module see the README.
15.1.1. try_first_pass
Starting with version 2.8 privacyidea_pam supports try_first_pass. In this case the password that exists in the PAM stack will be sent to privacyIDEA. If this password is successfully validated, than the user is logged in without additional requests. If the password is not validated by privacyIDEA, the user is asked for an additional OTP value.
Note
This can be used in conjunction with the passthru policy. In this case users with no tokens will be able to login with only the password in the PAM stack.
15.1.2. Use cases SSH and VPN
PrivacyIDEA can be easily used to setup a secure SSH login combining SSH keys with a second factor. The configuration is given in SSH Keys and OTP: Really strong two factor authentication on the privacyIDEA website.
Read more about how to use PAM to do OTP with OpenVPN.
15.2. Using pam_yubico
If you are using Yubikey tokens you might also use pam_yubico.
You can use Yubikey tokens for two more or less distinct applications.
The first is using privacyideas PAM module as described above.
In this case privacyidea handles the policies
for user access and password validation. This works fine, when you only use
privacyidea for token validation.
The second mode is using the standard PAM module for Yubikeys from Yubico
pam_yubico to handle the token validation. The upside is that you can
use the PAM module included with you distribution, but there are downsides as
well.
You can’t set a token PIN in privacyidea, because
pam_yubicotries to use the token PIN entered by the user as a system password (which is likely to fail), i.e. the PIN will be stripped bypam_yubicoand will not reach the privacyIDEA system.Setting the policy which tokens are valid for which users is done either in
~/.yubico/authorized_keysor in the file given by theauthfileoption in the PAM configuration. The api server will only validate the token, but not check any kind of policy.
You can work around the restrictions by using a clever combination of tokentype Yubikey and Yubico as follows:
enroll a Yubikey token with
yubikey_mass_enroll --mode YUBICO.do not set a token password.
do not assign the token to a user.
please make a note of yubikey.prefix (12 characters starting with vv).
Now the token can be used with pam_yubico, but will not allow any
user access in privacyidea. If you want to use the token with
pam_yubico see the manual page for details. You’ll want something like the
following in your PAM config:
auth required pam_yubico.so id=<apiid> key=<API key> \
     urllist=https://<privacyidea-server>/ttype/yubikey authfile=/etc/yubikeys/authorized_yubikeys
The file /etc/yubikeys/authorized_yubikeys contains a line
for each user with the username and the allowed tokens delimited
by “:”, for example:
<username>:<serial number1>:<prefix1>:<prefix2>
Now create a second token representing the Yubikey, but this time
use the Yubico Cloud mode. Go to Tokens -> Enroll Token and select
Yubico Cloud mode. Enter the 12 characters prefix you noted above
and assign this token to a user and possibly set a token PIN. It would
be nice to have the the serial number of the UBCM token correspond
to the UBAM token, but this is right now not possible with the WebUI.
In the WebUI, test the UBAM token without a Token PIN, test the UBCM token
with the stored Token PIN, and check the token info afterwards.
Check the Yubikey token via /ttype/yubikey, for example with:
ykclient --debug --url https://<privacyidea>/ttype/yubikey --apikey "<API key>" "apiid" <otp>
There should be successful authentications (count_auth_success), but no failures.
15.3. FreeRADIUS
Starting with privacyIDEA 2.19, there are two ways to integrate FreeRADIUS:
Using a Perl-based privacyIDEA plugin, which is available for FreeRADIUS 2.0.x and above. It supports advanced use cases (such as challenge-response authentication or attribute mapping). Read more about it at RADIUS plugin.
Using the rlm_rest plugin provided by FreeRADIUS 3.0.x and above. However, this setup does not support challenge-response or attribute mapping. Read more about it at Configuration of rlm_rest.
With either setup, you can test the RADIUS setup using a command like this:
echo "User-Name=user, User-Password=password" | radclient -sx yourRadiusServer \
   auth topsecret
Note
Do not forget to configure the clients.conf accordingly.
15.4. Microsoft NPS server
You can also use the Microsoft Network Protection Server with privacyIDEA. A full featured integration guide can be found at the NetKnights webpage.
15.5. simpleSAMLphp Plugin
You can install the plugin for simpleSAMLphp using the source files from the GitHub Repository simplesamplphp-module-privacyidea.
Follow the simpleSAMLphp instructions to configure your authsources.php. A usual configuration will look like this:
'example-privacyidea' => array(
    'privacyidea:privacyidea',

    /*
     * The name of the privacyidea server and the protocol
     * A port can be added by a colon
     * Required.
     */
    'privacyideaserver' => 'https://your.server.com',

    /*
     * Check if the hostname matches the name in the certificate
     * Optional.
     */
    'sslverifyhost' => False,

    /*
     * Check if the certificate is valid, signed by a trusted CA
     * Optional.
     */
    'sslverifypeer' => False,

    /*
     * The realm where the user is located in.
     * Optional.
     */
    'realm' => '',

    /*
     * This is the translation from privacyIDEA attribute names to
     * SAML attribute names.
     */
     'attributemap' => array('username' => 'samlLoginName',
                             'surname' => 'surName',
                             'givenname' => 'givenName',
                             'email' => 'emailAddress',
                             'phone' => 'telePhone',
                             'mobile' => 'mobilePhone',
                             ),
),
15.6. Keycloak
With the privacyIDEA Keycloak-provider, there is a plugin available for the Keycloak identity manager. It is available from the GitHub repository keycloak-provider.
Like simpleSAMLphp, it can be used to realize single sign-on use cases with a strong second factor authentication.
15.7. TYPO3
You can install the privacyIDEA extension from the TYPO3 Extension Repository. The privacyIDEA extension is easily configured.
privacyIDEA Server URL
This is the URL of your privacyIDEA installation. You do not need to add the path validate/check. Thus the URL for a common installation would be https://yourServer/.
Check certificate
Whether the validity of the SSL certificate should be checked or not.
Warning
If the SSL certificate is not checked, the authentication request could be modified and the answer to the request can be modified, easily granting access to an attacker.
Enable privacyIDEA for backend users
If checked, a user trying to authenticate at the backend will need to authenticate against privacyIDEA.
Enable privacyIDEA for frontend users
If checked, a user trying to authenticate at the frontend will need to authenticate against privacyIDEA.
Pass to other authentication module
If the authentication at privacyIDEA fails, the credential the user entered will be verified against the next authentication module.
This can come in handy, if you are setting up the system and if you want to avoid locking yourself out.
Anyway, in a productive environment you probably want to uncheck this feature.
15.8. OTRS
The OTRS Plugin can be found in its own GitHub Repository.
This perl module needs to be installed to the directory Kernel/System/Auth.
To activate the OTP authentication you need to add the following to
Kernel/Config.pm:
$Self->{'AuthModule'} = 'Kernel::System::Auth::privacyIDEA';
$Self->{'AuthModule::privacyIDEA::URL'} = \
        "https://localhost/validate/check";
$Self->{'AuthModule::privacyIDEA::disableSSLCheck'} = "yes";
Note
As mentioned earlier you should only disable the checking of the SSL certificate if you are in a test environment. For productive use you should never disable the SSL certificate checking.
Note
This plugin requires, that you also add the path validate/check to the URL.
15.9. Apache2
The Apache plugin uses mod_wsgi and redis to provide a basic
authentication on Apache2 side and validating the credentials against
privacyIDEA.
You need the authentication script privacyidea_apache.py and a valid
configuration in /etc/privacyidea/apache.conf. Both can be found on
GitHub.
To activate the OTP authentication on a “Location” or “Directory” you need to configure Apache2 like this:
<Directory /var/www/html/secretdir>
     AuthType Basic
     AuthName "Protected Area"
     AuthBasicProvider wsgi
     WSGIAuthUserScript /usr/share/pyshared/privacyidea_apache.py
     Require valid-user
</Directory>
Note
Basic Authentication sends the base64 encoded password on each request. So the browser will send the same one time password with each request. Thus the authentication module needs to cache the password when the authentication is successful. Redis is used for caching the password.
Warning
As redis per default is accessible by every user on the machine, you need to use this plugin with caution! Every user on the machine can access the redis database to read the passwords of the users. The cached credentials are stored as pbkdf2+sha512 hash.
15.10. NGINX
The NGINX plugin uses the internal scripting language lua of the NGINX
webserver and redis as caching backend to provide basic authentication
against privacyIDEA.
You can retrieve the nginx plugin from GitHub.
To activate the OTP authentication on a “Location” you need to include the
lua script that basically verifies the given credentials against the
caching backend. New authentications will be sent to a different (internal)
location via subrequest which points to the privacyIDEA authentication backend
(via proxy_pass).
For the basic configuration you need to include the following lines to your
location block:
location / {
    # additional plugin configuration goes here #
    access_by_lua_file 'privacyidea.lua';
}
location /privacyidea-validate-check {
    internal;
    proxy_pass https://privacyidea/validate/check;
}
You can customize the authentication plugin by setting some of the following
variables in the secured location block:
# redis host:port
# set $privacyidea_redis_host "127.0.0.1";
set $privacyidea_redis_post 6379;

# how long are accepted authentication allowed to be cached
# if expired, the user has to reauthenticate
set $privacyidea_ttl 900;

# privacyIDEA realm. leave empty == default
set $privacyidea_realm 'somerealm'; # (optional)

# pointer to the internal validation proxy pass
set $privacyidea_uri "/privacyidea-validate-check";

# the http realm presented to the user
set $privacyidea_http_realm "Secure zone (use PIN + OTP)";
Note
Basic Authentication sends the base64 encoded password on each request. So the browser will send the same one time password with each reqeust. Thus the authentication module needs to cache the password as the successful authentication. Redis is used for caching the password similar to the Apache2 plugin.
Warning
As redis per default is accessible by every user on the machine,
you need to use this plugin with caution! Every user on the machine can
access the redis database to read the passwords of the users. The cached
credentials are stored as SHA1_HMAC hash. If you prefer a stronger hashing
method feel free to extend the given password_hash/verify functions
using additional lua libraries (for example by using lua-resty-string).
15.11. ownCloud
The ownCloud plugin is an ownCloud user backend. The directory
user_privacyidea needs to be copied to your owncloud apps directory.
Activating the ownCloud plugin
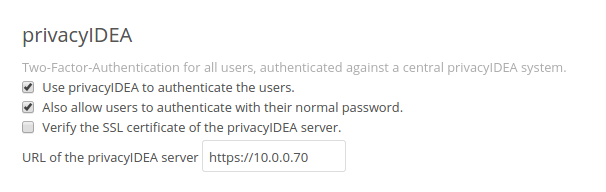
You can then activate the privacyIDEA ownCloud plugin by checking Use privacyIDEA to authenticate the users. All users now need to be known to privacyIDEA and need to authenticate using the second factor enrolled in privacyIDEA - be it an OTP token, Google Authenticator or SMS/Smartphone.
Checking Also allow users to authenticate with their normal passwords. lets the user choose if he wants to authenticate with the OTP token or with his original password from the original user backend.
Note
At the moment using a desktop client with a one time password is not supported.
ownCloud 9.1 and Nextcloud 10 come with a new two-factor framework. The new privacyIDEA ownCloud App allows you to add a second factor, that is centrally managed by privacyIDEA to the ownCloud or Nextcloud installation.
The ownCloud privacyIDEA App is available from the ownCloud App Store.
The App requires a subscription file to work for more than ten users. You can get the subscription file from NetKnights.
15.12. Django
You can add two factor authentication with privacyIDEA to Django using this Django plugin.
You can simply add PrivacyIDEA class to the AUTHENTICATION_BACKENDS
settings of Django.
15.13. OpenVPN
Read more about how to use OpenVPN with privacyidea at OTP with OpenVPN.
15.14. Windows
15.14.1. Credential Provider
The privacyIDEA Credential Provider adds two-factor authentication to the Windows desktop or Terminal server. See http://privacyidea-credential-provider.readthedocs.io
15.14.2. Provider Class
There is a .Net provider class, which you can use to integrate privacyIDEA authentication into other products and worflows. See https://github.com/sbidy/privacyIDEA_dotnetProvider
15.15. Further plugins
You can find further plugins for Dokuwiki, WordPress, Contao and Django at cornelinux Github page.
Again, check the Plugin Guide.